Exspost Blog - I will be
viewing one by one feature on the demo template before I'll share, so
hopefully You can create templates or create your own with the
modification of the default widgets that are already provided by
blogger. Widgets from my blogger
modification times are Popular Post, a widget that functions to display
the posting or article where the most interest its visitors. By default the widget is already attracting a Popular Post because there is already a feature of the thumbnail and summary. But
in my opinion it's conditional, it can be directly installed widget on
his blog that more use of article rather than an image, if the default
widgets that are installed on a blog-like gallery seemed less suitable.
DEMO
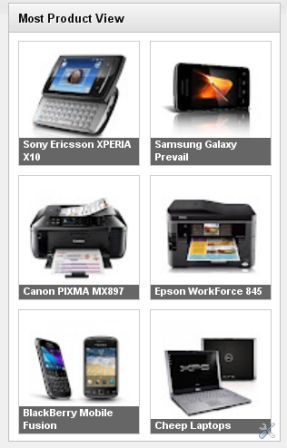
Well, this time I am trying to modify those widgets to fit is mounted on a blog that has content gallery. Picture as above, only showing thumbnails and title to the horizontal position. If you're interested, here's how to make it:
- Login to your account with Blogger
- After that go to >> click on template Edit HTML do not forget to tick the Expand Widget Templates.
- Then enter the following code above ]] > </b:skin> :
.PopularPosts. widget-content ul li {background: none repeat scroll 0 0 transparent; float: left; list-style: none outside none; margin: 0!important; padding: 0! important; border-bottom: none}.PopularPosts ul {padding: 0 5px}.-Item thumbnails PopularPosts. img {width:110px; height:110px; padding: an 11px; margin: 0}.PopularPosts. item-content {position: relative; float: left; margin: 0}.PopularPosts. item-title a {font-size: an 11px; color: # f f; display: block; padding: 0 5px; float: left; width: 122px}.PopularPosts. item-title: hover {opacity: 1;-moz-opacity: 0; filter: alpha (opacity = 100)}.-Item thumbnails PopularPosts. {float: left; margin: 3px 7px 10px "1px"; border: solid # ccc; "1px" overflow: hidden}.PopularPosts. item-title {background: # 000; position: absolute; bottom: 8px; right: 2px; opacity:. 8;-moz-opacity:. 8; filter: alpha (opacity = 6)}Color code Red above is the length and width of thumbnail images, you can change and customize your sidebar width in the template, as shown in the sidebar of this blog. - Then go to layout >> add a gadget select Popular Post on the fifth line.
- After the page appears Popular Post, setting as shown below:

To note is just the thumbnailcheck box, leave the boxes blank snippet does not need to be checked. The title and the number of post who wants to show up to you. - Following the steps above, go to Edit HTML (tick the Expand Widget Templates), locate the following code:< b:widget id = ' PopularPosts1 ' locked = ' false ' title = ' Popular Posts ' type = ' PopularPosts ' >
< b:includable id = ' main ' >
< b:if cond = ' data: title ' > <h2><data:title/></h2></b:if>
< div class = ' widget-content-> popular posts '
<ul>
< b:loop values = ' data: ' posts ' post ' var = >
<li>
< b:if cond = ' data: showThumbnails == & quot; false & quot; '>
< b:if cond = ' data: showSnippets == & quot; false & quot; '>
<!--(1) No snippet/thumbnails-->
< a href = ' expr: data: post href > <data:post.title/></a>. '
<b:else/>
<!--(2) Show only snippets-->
< div class = ' item-title ' expr: >< a href = ' data: post href > <data:post.title/></a></div>. '
< div class = ' snippet ' item-> <data:post.snippet/></div>
</b:if>
<b:else/>
< b:if cond = ' data: showSnippets == & quot; false & quot; '>
<!--(3) Show only thumbnails-->
< div class = ' item-thumbnails-only ' >
< b:if cond = ' data: ' thumbnail post. >
< div class = ' thumbnail ' items->
< a href = ' expr: data: href ' post. ' target = _blank ' >
<img alt='' border='0' expr:height='data:thumbnailSize' expr:src='data:post.thumbnail' expr:width='data:thumbnailSize'/>
</a>
</div>
</b:if>
<div class='item-title'><a expr:href='data:post.href'><data:post.title/></a></div>
</div>
<div style='clear: both;'/>
<b:else/>
<!-- (4) Show snippets and thumbnails -->
<div class='item-content'>
<b:if cond='data:post.thumbnail'>
<div class='item-thumbnail'>
<a expr:href='data:post.href' target='_blank'>
<img alt='' border='0' expr:height='data:thumbnailSize' expr:src='data:post.thumbnail' expr:width='data:thumbnailSize'/>
</a>
</div>
</b:if>
<div class='item-title'><a expr:href='data:post.href'><data:post.title/></a></div>
<div class='item-snippet'><data:post.snippet/></div>
</div>
<div style='clear: both;'/>
</b:if>
</b:if>
</li>
</b:loop>
</ul>
<b:include name='quickedit'/>
</div>
</b:includable>
</b:widget> - Setelah ketemu, ganti dengan kode berikut ini :
<b:widget id='PopularPosts1' locked='false' title='Most Product View' type='PopularPosts'>
<b:includable id='main'>
<b:if cond='data:title'><h2><data:title/></h2></b:if>
<div class='widget-content popular-posts'>
<ul>
<b:loop values='data:posts' var='post'>
<li>
<b:if cond='data:showThumbnails == "false"'>
<b:if cond='data:showSnippets == "false"'>
<!-- (1) No snippet/thumbnail -->
<a expr:href='data:post.href'><data:post.title/></a>
<b:else/>
<!-- (2) Show only snippets -->
<div class='item-title'><a expr:href='data:post.href'><data:post.title/></a></div>
<div class='item-snippet'><data:post.snippet/></div>
</b:if>
<b:else/>
<b:if cond='data:showSnippets == "false"'>
<!-- (3) Show only thumbnails -->
<div class='item-content'>
<b:if cond='data:post.thumbnail'>
<div class='item-thumbnail'>
<a expr:href='data:post.href' target='_blank'>
<img alt='' border='0' expr:height='data:thumbnailSize' expr:src='data:post.thumbnail' expr:width='data:thumbnailSize'/>
</a>
</div>
</b:if>
<div class='item-title'><a expr:href='data:post.href'><data:post.title/></a></div>
</div>
<div style='clear: both;'/>
<b:else/>
<!-- (4) Show snippets and thumbnails -->
<div class='item-content'>
<b:if cond='data:post.thumbnail'>
<div class='item-thumbnail'>
<a expr:href='data:post.href' target='_blank'>
< img alt = '' border = ' 0 ' expr: height = ' data: ' expr thumbnailSize: src = ' data: thumbnail post. ' expr: width = ' data: thumbnailSize '/>
</a>
</div>
</b:if>
< div class = ' item-title ' expr: >< a href = ' data: post href > <data:post.title/></a></div>. '
< div class = ' snippet ' item-> <data:post.snippet/></div>
</div>
< div style = "clear: both; '/>
</b:if>
</b:if>
</li>
</b:loop>
</ul>
< b:include name = ' quickedit '/>
</div>
</b:includable>
</b:widget> - Lastly, save templates see the result.
Popular
Post widget modifications of this blogger not only for blog gallery, you
could also wear it on a blog is not a gallery as seen on the sidebar of
this blog. So last display Popular Post
tutorial for modifying the template Gallery if there is do not
understand please feel free to leave a message in the comment box sorry
if there is already a tutorial like this before, good luck and hopefully
useful


0 comments:
Post a Comment